本站收集了一篇相关的编程文章,网友贾芳泽根据主题投稿了本篇教程内容,涉及到socket编程java、java、socket网络编程、Java、socket、Socket编程示例相关内容,已被446网友关注,涉猎到的知识点内容可以在下方电子书获得。
Socket编程示例
传统Socket基于BIO实现一个简单的聊天服务器
服务端代码如下
public class MyServerSocket {
  public static void main(String[] args) throws IOException {
    ServerSocket serverSocket = new ServerSocket();
    // 绑定5000端口
    serverSocket.bind(new InetSocketAddress("127.0.0.1", 5000));
    System.out.println("服务端启动成功...");
    while (true) {
      // 如果获取不到socket就会一致阻塞在此
      Socket socket = serverSocket.accept();
      InputStream is = socket.getInputStream();
      byte[] buf = new byte[1024];
      int len = is.read(buf);
      System.out.println("客户端说:" + new String(buf, 0, len, StandardCharsets.UTF_8));
      OutputStream os = socket.getOutputStream();
      os.write("你好客户端,我收到你的消息了".getBytes(StandardCharsets.UTF_8));
    }
  }
}
客户端代码如下
public class ClientSocket {
  public static void main(String[] args) throws IOException {
    Socket socket = new Socket();
    socket.connect(new InetSocketAddress("127.0.0.1",5000));
    OutputStream os = socket.getOutputStream();
    os.write("hello服务端~".getBytes(StandardCharsets.UTF_8));
    InputStream is = socket.getInputStream();
    byte[] buf = new byte[1024];
    int len = is.read(buf);
    System.out.println("服务器说:" + new String(buf, 0, len, StandardCharsets.UTF_8));
  }
}
先启动服务器端,再启动客户端。即可
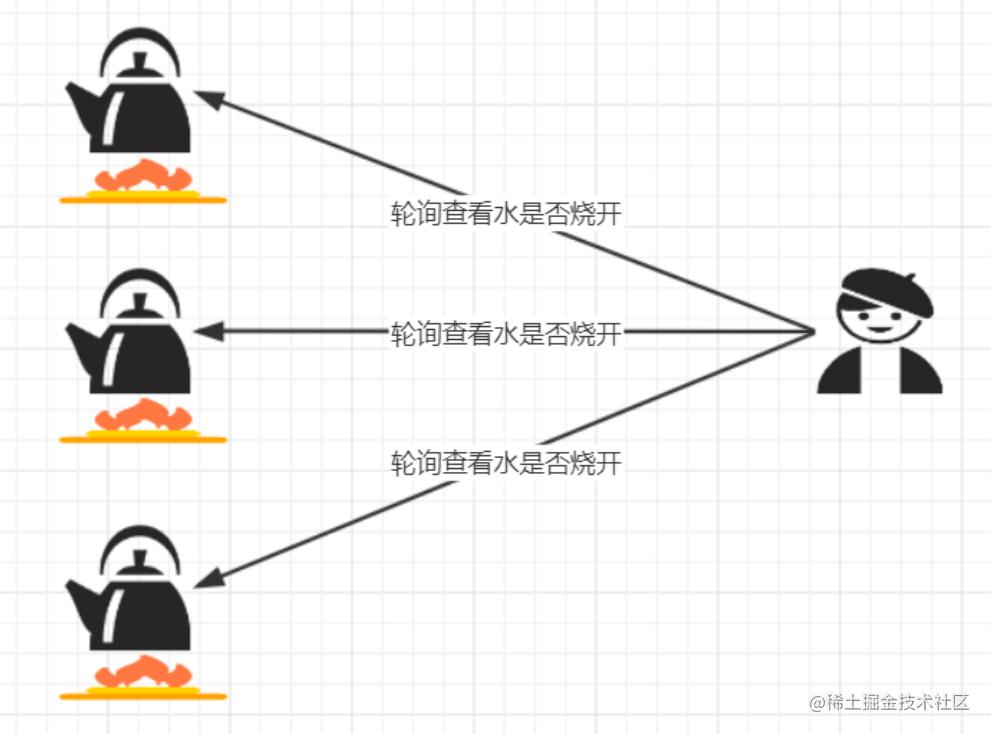
传统BIO是阻塞的,举个烧水的例子来理解

Socket编写一个简单的Http服务器
http服务器的代码
public class HttpServer {
  private static String response = """
      HTTP/1.1 200 OK
      content-type: text/html

      <h1>hello,client</h1>
      """;

  public static void main(String[] args) throws IOException {
    ServerSocket serverSocket = new ServerSocket();
    serverSocket.bind(new InetSocketAddress("127.0.0.1", 5001));
    System.out.println("HTTP服务器启动成功");
    while (true) {
      Socket client = serverSocket.accept();
      // 获取客户端发送过来的数据
      InputStream is = client.getInputStream();
      byte[] buf = new byte[1024];
      int len = is.read(buf);
      System.out.println("客户端发送过来的数据:" + new String(buf, 0, len, StandardCharsets.UTF_8));
      // 给客户端响应HTTP协议的数据
      OutputStream os = client.getOutputStream();
      os.write(response.getBytes(StandardCharsets.UTF_8));
      // 注意:要关闭客户端资源
      client.close();
    }
  }
}只要响应数据满足HTTP协议,就可以通过浏览器访问到页面,下面我们使用浏览器访问下
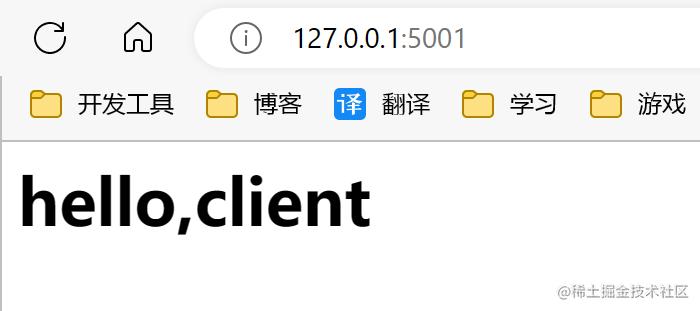
基于NIO的非阻塞简单服务器实现
传统BIO会阻塞,使用NIO通道编程可以设置服务器为非阻塞,当未获取到连接时,可以处理其他的逻辑。相当于线程模型换了。下面是服务端代码,客户端代码不变,采用BIO的即可
public class NioServerSocket {
  public static void main(String[] args) throws IOException, InterruptedException {
    ServerSocketChannel serverSocketChannel = ServerSocketChannel.open();
    serverSocketChannel.bind(new InetSocketAddress("127.0.0.1", 5002));
    serverSocketChannel.configureBlocking(false); // 设置非阻塞
    while (true) {
      SocketChannel clientChannel = serverSocketChannel.accept();
      if (clientChannel == null) {
        System.out.println("客户端无连接,休息一下");
        Thread.sleep(1000);
        continue;
      }
      Socket socket = clientChannel.socket();
      InputStream is = socket.getInputStream();
      byte[] buf = new byte[1024];
      int len = is.read(buf);
      System.out.println("客户端发送过来的数据:" + new String(buf, 0, len, StandardCharsets.UTF_8));
      socket.close();
      clientChannel.close();
    }
  }
}
第二种实现方式如下
public class NioServerSocket2 {
  public static void main(String[] args) throws IOException, InterruptedException {
    ServerSocketChannel serverSocketChannel = ServerSocketChannel.open();
    serverSocketChannel.bind(new InetSocketAddress("127.0.0.1", 5002));
    serverSocketChannel.configureBlocking(false); // 设置非阻塞
    while (true) {
      SocketChannel clientChannel = serverSocketChannel.accept();
      if (clientChannel == null) {
        System.out.println("客户端无连接,休息一下");
        Thread.sleep(1000);
        continue;
      }
      ByteBuffer buffer = ByteBuffer.allocate(1024);
      int len = clientChannel.read(buffer);
      System.out.println("客户端说" + new String(buffer.array(), 0, len));
      clientChannel.close();
    }
  }
}
但是该实现也有一个问题:虽然客户端的连接过程不会阻塞了,但是客户端发送数据会阻塞服务端。如果客户端发送数据过大,假设要10秒,那服务端调用read方法读取数据就要等待客户端至少10秒。
基于NIO的Selector的简单服务器实现
selector的服务端如下,这是要给单线程的服务端。相比上一小节没有使用selector,它的优点就是连接事件和读事件都不会阻塞了。即使客户端发送数据很慢,服务端也不会阻塞。
缺点是单线程执行,如果一个线程抢到读就绪事件并且处理的很慢,就会影响整体性能。
public class NioSelectorServerSocket {
  public static void main(String[] args) throws Exception {
    // 1. 获取通道
    ServerSocketChannel serverSocketChannel = ServerSocketChannel.open();
    serverSocketChannel.bind(new InetSocketAddress("127.0.0.1", 5003));
    serverSocketChannel.configureBlocking(false);
    // 2. 获取选择器
    Selector selector = Selector.open();
    // 3. 把通道注册到选择器上,只注册连接继续事件
    serverSocketChannel.register(selector, SelectionKey.OP_ACCEPT);
    System.out.println("服务器启动成功...");
    while (true) {
      // 4. 不断轮询选择器中是否由连接事件
      int select = selector.select(2000);
      if (select == 0) {
        System.out.println("暂时没有客户端连接哦");
        continue;
      }
      // 5. 如果有连接继续事件,获取客户端通道
      Set<SelectionKey> selectionKeys = selector.selectedKeys();
      Iterator<SelectionKey> iterator = selectionKeys.iterator();
      while (iterator.hasNext()) {
        SelectionKey key = iterator.next();
        if (key.isAcceptable()) {
          SocketChannel client = serverSocketChannel.accept();
          //SocketChannel client = ((ServerSocketChannel) key.channel()).accept(); // 两种写法都一样
          client.configureBlocking(false);
          // 6. 为每个连接都注册写事件监听
          client.register(selector, SelectionKey.OP_READ);
          System.out.println("已注册可读事件");
        }
        if (key.isReadable()) {
          SocketChannel client = (SocketChannel) key.channel();
          // 7. 监听到可读事件,处理可读事件
          ByteBuffer buffer = ByteBuffer.allocate(1024);
          int len = client.read(buffer);
          System.out.println("客户端说:" + (len > 0 ? new String(buffer.array(), 0, len, StandardCharsets.UTF_8) : ""));
          // 8. 关闭资源
          client.close();
        }
        iterator.remove();
      }
    }
  }
}
它的线程模型还是用烧水的例子来举例
总结
到此这篇关于Socket编程简单示例的文章就介绍到这了,更多相关Socket编程示例内容请搜索码农之家以前的文章或继续浏览下面的相关文章希望大家以后多多支持码农之家!


